If you’re just starting out with gas chromatography (GC), this guide is for you. Let’s break down the basics, add some real-life examples, and help you get comfortable with GC method development—no jargon overload, just practical advice and friendly tips.
So, What’s Gas Chromatography Anyway?
GC is a super useful technique for separating and analyzing stuff that can be turned into a gas. You’ll find it everywhere—from testing water quality to checking for impurities in medicines.
The Main Parts:
- Stationary Phase: This is what stays put inside the column. It can be solid or liquid. Most GC columns today use a liquid stationary phase in thin capillary tubes.
- Mobile Phase: This is the gas that carries your sample through the column. Common choices are nitrogen, helium, or hydrogen.
- Fun Fact: GC was invented by A. T. James and A. J. P. Martin back in 1952.
How Does GC Work? (It’s Easier Than You Think!)
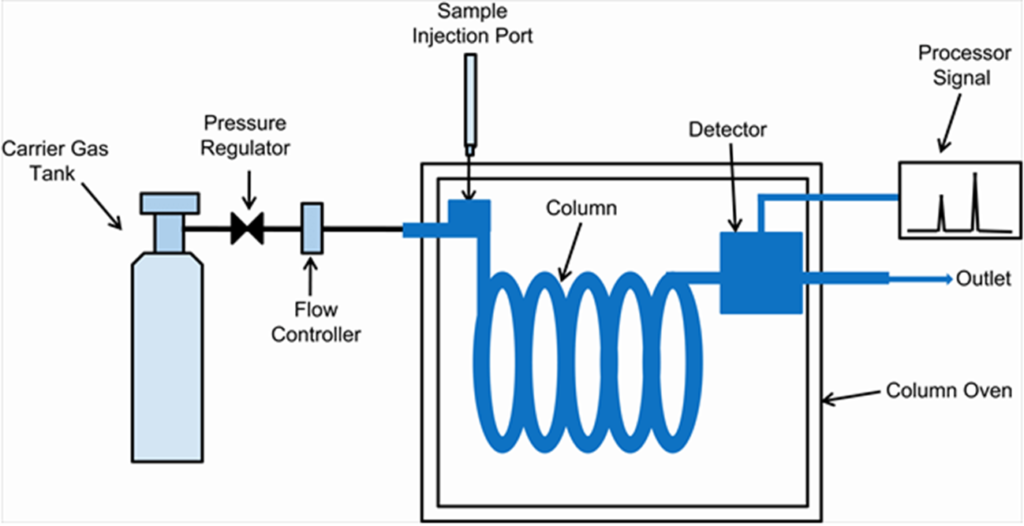
- Inject Your Sample: Heat it up so it turns into a vapor, then send it into the column with a stream of carrier gas.
- Separation Time: As your sample travels through the column, its components get separated based on how they interact with the stationary phase.
- Detection: Each separated part pops out of the column and gets detected—showing up as peaks on a graph called a chromatogram.
Practical Example:
Imagine you want to check if your drinking water contains any leftover solvents. You inject a tiny amount into the GC, and the instrument separates and detects each solvent, showing you exactly what’s in there!
Picking the Right Column (Don’t Stress!)
- Capillary Columns: These are the go-to for most GC work. They’re efficient and easy to use.
- Stationary Phase Matters: For polar compounds, grab a polar column (like cyanopropyl or WAX). For nonpolar stuff, use a nonpolar column (like PDMS).
- Size Guide: A 30-meter column with a 0.25 mm inner diameter and 0.25 μm film thickness is a solid starting point. If you want faster results or have fewer things to separate, try a 15-meter column.
Practical Example:
Let’s say you’re analyzing alcohols in a beverage. A polar column like DB-WAX will give you sharp, well-separated peaks for those alcohols. If you’re checking for hydrocarbons in gasoline, a nonpolar column like DB-1 is your best friend.
Carrier Gases: Which One Should You Use?
- Hydrogen: Fast and sharp results, but you need to be careful with safety.
- Helium: Great performance, but it can be pricey and sometimes hard to find.
- Nitrogen: Cheap, but not as efficient.
- For GC-MS, helium is usually the top pick.

Practical Example:
If you’re running a routine test and want to save money, nitrogen is fine. But if you need high resolution for a tricky sample, go with helium or hydrogen (just follow safety protocols!).
What Can You Analyze with GC?
- Volatile compounds (like residual solvents)
- Small molecules without UV chromophores
- Some big, nonpolar compounds
- Not volatile? No problem—many compounds can be chemically tweaked (derivatized) to make them GC-friendly.
Practical Example:
You’re testing a pharmaceutical intermediate that doesn’t vaporize easily. By derivatizing it (adding a chemical group), you make it volatile enough for GC analysis.
Getting Your Sample Into the GC
- Liquid Injection: Adjust how much you inject, the temperature, and the solvent to avoid overloading.
- Headspace Analysis: Perfect for sniffing out volatile compounds in tricky samples.
- SPME (Solid Phase Micro Extraction): Boosts sensitivity for tiny amounts and cuts down on background noise.
Practical Example:
You’re investigating a weird smell in fertilizer. Headspace analysis might not pick up the culprit, but SPME can concentrate those smelly compounds and help you identify the source!
Inlet Types: What’s Best for You?
- Split Injection: Good for strong samples; you can control how much goes in.
- Splitless Injection: For detecting tiny amounts; tweak purge time and starting temperature.
- Cool On-Column: Great for heat-sensitive stuff.
- Multi-Mode Inlet: Super flexible—lets you program temperature and try different injection styles.
Practical Example:
If you’re analyzing trace pesticides in food, use splitless injection to get the best sensitivity. For a concentrated solvent sample, split injection prevents overload and keeps your chromatogram clean.
Tips for Better Separation
- Temperature Programming: Start low, ramp up slowly (5–10 °C/min), and hold at the end to get everything out.
- Column Tweaks: Smaller diameter and thicker film can help you see more detail.
- Carrier Gas Flow: Adjust for your column and detector type.
Practical Example:
You’re running a mix of solvents. Start at 40°C, ramp up to 200°C at 10°C/min, and hold for a few minutes. If two peaks are too close, slow down the ramp or try a thinner column.
Meet the Detectors
- FID (Flame Ionization Detector): Awesome for hydrocarbons, super sensitive.
- TCD (Thermal Conductivity Detector): Universal and gentle, but not as sensitive.
- ECD (Electron Capture Detector): Loves halogenated compounds—super sensitive!
- NPD (Nitrogen Phosphorus Detector): Great for nitrogen and phosphorus.
- GC-MS (Mass Spectrometry): The all-rounder—detects almost anything, with high sensitivity.
Practical Example:
If you’re checking for pesticide residues, ECD is your go-to. For general impurity profiling, FID or GC-MS will cover most needs.
Friendly Advice for New Chromatographers
- Take Care of Your Columns: Store them right, don’t overheat, and keep moisture out.
- Start Simple: Pick a general-purpose column, set up your injection and detector, then tweak temperature and flow as you go.
- Use Online Tools: Check out calculators and chromatogram libraries from Agilent and Restek—they’re lifesavers for troubleshooting and method transfer.
Practical Example:
If your peaks look weird or you’re getting “column bleed,” check if you’ve exceeded the temperature limit or if the column needs replacing. Use online calculators to double-check your injection volume and liner capacity.
Common Mistakes to Avoid in Gas Chromatography
1. Overloading the Column
Injecting too much sample can cause broad, messy peaks and poor separation. Always start with a small injection volume and increase only if needed.
2. Wrong Column Choice
Using the wrong stationary phase or column dimensions can make it hard to separate your compounds. Match your column’s polarity to your analytes (e.g., polar column for polar compounds) and start with standard dimensions like 30 m × 0.25 mm ID × 0.25 μm film thickness.
3. Ignoring Temperature Limits
Columns have maximum temperature ratings. Exceeding these can cause “column bleed” (extra noise and ghost peaks) and shorten column life. Always check the specs before running high-temperature programs.
4. Improper Sample Preparation
Injecting dirty or particulate-laden samples can clog the inlet or column. Always filter or clean up your samples as needed and consider headspace or SPME for complex matrices.
5. Incorrect Inlet Settings
Choosing the wrong injection mode (split vs. splitless) or not optimizing purge times can lead to poor sensitivity or overloaded peaks. Match your inlet settings to your sample concentration and analysis goals.
6. Neglecting Column Care
Leaving columns open to air, moisture, or not storing them properly can damage the stationary phase. Always cap columns when not in use and store them as recommended.
7. Using the Wrong Carrier Gas or Flow Rate
Not all detectors or columns work best with the same carrier gas or flow. For example, using nitrogen with GC-MS can reduce sensitivity. Check your method and instrument recommendations.
8. Skipping System Checks
Not checking for leaks, proper connections, or instrument readiness can lead to wasted samples and time. Always run a quick system check before starting your analysis.
9. Not Optimizing Temperature Programs
Using a single isothermal temperature or a too-fast ramp can cause poor separation. Try moderate ramps (5–10 °C/min) and adjust as needed for your analytes.
10. Forgetting to Use Online Tools
There are great calculators and chromatogram libraries online (like from Agilent and Restek) to help with method setup and troubleshooting. Don’t hesitate to use them—they can save you a lot of guesswork.
Wrapping Up
GC is a fantastic tool, and you don’t need to be a wizard to get good results. Start with the basics, experiment a little, and you’ll be separating compounds like a pro in no time. Remember, even small changes can make a big difference—so don’t be afraid to play around and see what works!
Want more tips or have questions? Drop a comment below or check out these handy resources:
Leave a Reply